Friday, February 05, 2010

Design patterns : Builder

The purpose of a builder is to separate the construction process of a complex object from its representation so that the same construction process can be used to create different representations.

The participating actors are a "director" which interprets the information and invokes the "builder" to get the object built. The builder creates parts of a complex object each time it is called and maintains the state of the object. Eventually when the product is complete, the client can retrieve the product from the "builder".

Lets check out some code:

In PHP

abstract class AbstractPageBuilder //abstract builder
{
  abstract function getPage();
}

abstract class AbstractPageDirector //abstract director
{
  abstract function __construct(AbstractPageBuilder $builder_in);
  abstract function buildPage();
  abstract function getPage();
}

class HTMLPage //product 
{
  private $page = NULL;
  private $page_title = NULL;
  private $page_heading = NULL;
  private $page_text = NULL;
  function __construct() 
  {  }
  function showPage() 
  {
    return $this->page;
  }
  function setTitle($title_in) 
  {
    $this->page_title = $title_in;
  }
  function setHeading($heading_in) 
  {
    $this->page_heading = $heading_in;
  }
  function setText($text_in) 
  {
    $this->page_text .= $text_in;
  }
  function formatPage() 
  {
    $this->page  = "<html>\n";
    $this->page .= "<head><title>".$this->page_title."</title></head>\n";
    $this->page .= "<body>\n";
    $this->page .= "<h1>".$this->page_heading."</h1>\n";
    $this->page .= $this->page_text;
    $this->page .= "\n</body>\n";
    $this->page .= "</html>";
  }
}

class HTMLPageBuilder extends AbstractPageBuilder //concrete builder
{
  private $page = NULL;
  function __construct() 
  {
    $this->page = new HTMLPage();
  }
  function setTitle($title_in) 
  {
    $this->page->setTitle($title_in);
  }
  function setHeading($heading_in) 
  {
    $this->page->setHeading($heading_in);
  }
  function setText($text_in) 
  {
    $this->page->setText($text_in);
  }
  function formatPage() 
  {
    $this->page->formatPage();
  }
  function getPage() 
  {
    return $this->page;
  }
}

class HTMLPageDirector extends AbstractPageDirector //concrete director
{
  private $builder = NULL;
  public function __construct(AbstractPageBuilder $builder_in) 
  {
    $this->builder = $builder_in;
  }
  public function buildPage() 
  {
    $this->builder->setTitle('Testing HTMLPage Title');
    $this->builder->setHeading('Testing HTMLPage Heading');
    $this->builder->setText('Body1 Testing, testing, testing!');
    $this->builder->setText('Body2 Testing, testing, testing, or!');
    $this->builder->setText('Body3 Testing, testing, testing, more!');
    $this->builder->formatPage();
  }
  public function getPage() 
  {
    return $this->builder->getPage();
  }
}

echo("BEGIN\n");

$pageBuilder = new HTMLPageBuilder();
$pageDirector = new HTMLPageDirector($pageBuilder);
$pageDirector->buildPage();
$page = $pageDirector->GetPage();
echo $page->showPage();
echo "\nEND\n";

Output:

BEGIN
<html>
<head><title>Testing HTMLPage Title</title></head>
<body>
<h1>Testing HTMLPage Heading</h1>
Body1 Testing, testing, testing!Body2 Testing, testing, testing, or!Body3 Testing, testing, testing, more!
</body>
</html>
END


The classic pizza example in java

/* "Product" */
class Pizza 
{
  private String dough = "";
  private String sauce = "";
  private String topping = "";

  public void setDough(String dough)     { this.dough = dough; }
  public void setSauce(String sauce)     { this.sauce = sauce; }
  public void setTopping(String topping) { this.topping = topping; }

  public void showPizza()
  {
    System.out.println("PIZZA........");
    System.out.println("Dough : "+this.dough);
    System.out.println("Sauce : "+this.sauce);
    System.out.println("Topping : "+this.topping);
    System.out.println("----------");
  }
}

/* "Abstract Builder" */
abstract class PizzaBuilder 
{
  protected Pizza pizza;

  public Pizza getPizza() { return pizza; }
  public void createNewPizzaProduct() 
  { 
    pizza = new Pizza(); 
  }

  public abstract void buildDough();
  public abstract void buildSauce();
  public abstract void buildTopping();

}

/* "ConcreteBuilder" */
class HawaiianPizzaBuilder extends PizzaBuilder 
{
  public void buildDough()   { pizza.setDough("cross"); }
  public void buildSauce()   { pizza.setSauce("mild"); }
  public void buildTopping() { pizza.setTopping("ham+pineapple"); }
}

/* "ConcreteBuilder" */
class SpicyPizzaBuilder extends PizzaBuilder 
{
  public void buildDough()   { pizza.setDough("pan baked"); }
  public void buildSauce()   { pizza.setSauce("hot"); }
  public void buildTopping() { pizza.setTopping("pepperoni+salami"); }
}

/* "Director" */
class Waiter 
{
  private PizzaBuilder pizzaBuilder;

  public void setPizzaBuilder(PizzaBuilder pb) { pizzaBuilder = pb; }
  public Pizza getPizza() { return pizzaBuilder.getPizza(); }

  public void constructPizza() 
  {
    pizzaBuilder.createNewPizzaProduct();
    pizzaBuilder.buildDough();
    pizzaBuilder.buildSauce();
    pizzaBuilder.buildTopping();
  }
}

/* A customer ordering a pizza. */
public class BuilderExample 
{
  public static void main(String[] args) 
  {
    Waiter waiter = new Waiter();
    PizzaBuilder hawaiian_pizzabuilder = new HawaiianPizzaBuilder();
    PizzaBuilder spicy_pizzabuilder = new SpicyPizzaBuilder();

    waiter.setPizzaBuilder( hawaiian_pizzabuilder );
    waiter.constructPizza();

    Pizza pizza = waiter.getPizza();
    pizza.showPizza();
  }
}

Output:

PIZZA........
Dough : cross
Sauce : mild
Topping : ham+pineapple
----------
Design patterns : Abstract Factory

The abstract factory pattern provides an interface for creating families of related or dependent objects without specifying their concrete classes. It encapsulates the possibility of creation of a suite of "products" which otherwise would have required a sequence of "if .. then .. else" statements. The abstract factory has the responsibility for providing creation services for the entire family of objects. Clients never create the objects directly - they ask the factory to do that for them.

This mechanism makes changing the entiry family of objects easy - because the specific class of factory object appears only once in the application - where it was instantiated. The application can replace the entire family of objects by simply instantiating a different instance of the abstract factory. It also provides for lazy creation of objects.

The participating actors here are the client, the abstract factory, the abstract product, the concrete factory and the concrete product. The abstract factory defines which objects the concrete factory will need to be able to create. The concrete factory must create the correct objects for its context, ensuring that all objects created by the concrete factory are able to work correctly for a given circumstance.

Lets take an example to explain the situation. The AbstractBookFactory specifies that two classes - the AbstractPHPBook and the AbstractMySQLBook will need to be created by the concrete factory. The concreate factory OReillyBookFactory extends the AbstractBookFactory and can create the objects for OReillyPHPBook and OReillyMySQLBook which are correct classes for the context of OReilly.

abstract class AbstractBookFactory
{
  abstract function makePHPBook();
  abstract function makeMySQLBook();
}

//for objects in context of OReilly
class OReillyBookFactory extends AbstractBookFactory
{
  private $context = "OReilly";
  function makePHPBook()
  {
    return new OReillyPHPBook;
  }
  function makeMySQLBook()
  {
    return new OReillyMySQLBook;
  }
}

//for objects in context of Sams
class SamsBookFactory extends AbstractBookFactory
{
  private $context = "Sams";
  function makePHPBook()
  {
    return new SamsPHPBook;
  }
  function makeMySQLBook()
  {
    return new SamsMySQLBook;
  }
}

//Classes for books
abstract class AbstractBook
{
  abstract function getAuthor();
  abstract function getTitle();
}

abstract class AbstractPHPBook
{
  private $subject = "PHP";
}

abstract class AbstractMySQLBook
{
  private $subject = "MySQL";
}

class OReillyPHPBook extends AbstractPHPBook
{
  private $author;
  private $title;

  function __construct()
  {
    $this->author = "OReilly : php author 1";
    $this->title = "OReilly : title for php";
  }

  function getAuthor()
  {
    return $this->author;
  }

  function getTitle()
  {
    return $this->title;
  }
}

class SamsPHPBook extends AbstractPHPBook
{
  private $author;
  private $title;

  function __construct()
  {
    $this->author = "Sams : php author";
    $this->title = "Sams : title for php";
  }

  function getAuthor()
  {
    return $this->author;
  }

  function getTitle()
  {
    return $this->title;
  }
}

class OReillyMySQLBook extends AbstractMySQLBook
{
  private $author;
  private $title;

  function __construct()
  {
    $this->author = "OReilly : MySQL author";
    $this->title = "OReilly : title for MySQL";
  }

  function getAuthor()
  {
    return $this->author;
  }

  function getTitle()
  {
    return $this->title;
  }
}

class SamsMySQLBook extends AbstractMySQLBook
{
  private $author;
  private $title;

  function __construct()
  {
    $this->author = "Sams : MySQL author";
    $this->title = "Sams : title for MySQL";
  }

  function getAuthor()
  {
    return $this->author;
  }

  function getTitle()
  {
    return $this->title;
  }
}

//testing 

echo("Begin\n");
echo("Testing OReillyBookFactory\n");
$bookFactoryInstance = new OReillyBookFactory;
testConcreteFactory($bookFactoryInstance);
echo("----\n");

echo("Testing SamsBookFactory\n");
$bookFactoryInstance = new SamsBookFactory;
testConcreteFactory($bookFactoryInstance);
echo("----\n");

function testConcreteFactory($bookFactoryInstance)
{
  $phpBook = $bookFactoryInstance->makePHPBook();
  echo "php author : ".$phpBook->getAuthor()."\n";
  echo "php title : ".$phpBook->getTitle()."\n";

  $mysqlBook = $bookFactoryInstance->makeMySQLBook();
  echo "mysql author : ".$mysqlBook->getAuthor()."\n";
  echo "mysql title : ".$mysqlBook->getTitle()."\n";
}

//Output

Begin
Testing OReillyBookFactory
php author : OReilly : php author 1
php title : OReilly : title for php
mysql author : OReilly : MySQL author
mysql title : OReilly : title for MySQL
----
Testing SamsBookFactory
php author : Sams : php author
php title : Sams : title for php
mysql author : Sams : MySQL author
mysql title : Sams : title for MySQL
----

Another example using java

interface GUIFactory //Abstract Factory 
{
  public Button createButton();
}

class WinFactory implements GUIFactory //concrete Factory
{
  public Button createButton() 
  {
    return new WinButton();
  }
}

class OSXFactory implements GUIFactory //Concrete Factory
{
  public Button createButton() 
  {
    return new OSXButton();
  }
}

interface Button //Abstract Product 
{
  public void paint();
}

class WinButton implements Button //concrete Product
{
  public void paint() 
  {
    System.out.println("I'm a WinButton");
  }
}


class OSXButton implements Button //concrete Product
{
  public void paint() 
  {
    System.out.println("I'm an OSXButton");
  }
}


class Application //execution free of product type 
{
  public Application(GUIFactory factory)
  {
    Button button = factory.createButton();
    button.paint();
  }
}

public class ApplicationRunner 
{
  public static void main(String[] args) 
  {
    if(args.length != 1)
    {
      System.out.println("usage : java ApplicationRunner <0/1>");
      System.exit(1);
    }
    new Application(createOsSpecificFactory(args[0]));
  }

  public static GUIFactory createOsSpecificFactory(String ostype) 
  {
    if (ostype.equals("0"))
    {
      return new WinFactory();
    } 
    else 
    {
      return new OSXFactory();
    }
  }
}

Output
------

$ java ApplicationRunner 0
I'm a WinButton
$ java ApplicationRunner 1
I'm an OSXButton

Tuesday, February 02, 2010

Restore grub 2 after windows installation

Here is the step by step guide to recover Grub 2 (with ubuntu 9.10) after windows install. The steps are different than for recovering Grub 1 (as explained in this post:

You will need a LIVE cd if you are going to recover an Ubuntu Box. Boot the system with Live CD (I assume you are using Ubuntu Live CD). Press Alt+F2 and enter gnome-terminal command. And continue typing :

$sudo fdisk -l

This will show your partition table:

Device Boot Start End Blocks Id System
/dev/sda1 * 1 12748 102398278+ 7 HPFS/NTFS
/dev/sda2 12749 60800 385977690 f W95 Ext'd (LBA)
/dev/sda5 12749 13003 2048256 82 Linux swap / Solaris
/dev/sda6 13004 16827 30716248+ 83 Linux
/dev/sda7 16828 25272 67834431 83 Linux
/dev/sda8 25273 32125 55046302+ 7 HPFS/NTFS
/dev/sda9 32126 60800 230331906 7 HPFS/NTFS


Now we need to mount Linux (sda6 and sda7 here). sda6 is the / partition and sda7 is the /home partition. So mount them accordingly. If you have any other partitions (specially boot partition) dont forget to mount them.

$sudo mount /dev/sda6 /mnt
$sudo mount /dev/sda7 /mnt/home
$sudo mount --bind /dev /mnt/dev
$sudo mount --bind /proc /mnt/proc
$sudo mount --bind /sys /mnt/sys

Now chroot into the enviroment we made :

$sudo chroot /mnt

You may want to edit /etc/default/grub file to fit your system (timeout options etc)

$vi /etc/default/grub

Once you are thru install grub2 by using

$grub-install /dev/sda

If you get errors with that code use:

$grub-install --recheck /dev/sda

Now you can exit the chroot, umount the system and reboot your box :

$exit
$sudo umount /mnt/home
$sudo umount /mnt/sys
$sudo umount /mnt/dev
$sudo umount /mnt/proc
$sudo umount /mnt
$sudo reboot

Friday, January 29, 2010

Design patterns : Singleton pattern

Singleton design pattern is required when you want to allow only one instance of the class to be created. Database connections and filesystems are examples where singleton classes might be required. You can also use a singleton class to store variables which need global access - thereby limiting the scope of those variables and keeping the global space variable free.

With singleton design pattern, following points need to be ensured
  • Ensure that only a single instance of the class is created.
  • Provide a global point of access to the object.
  • The creation of the object should be thread safe to avoid multiple instances in a multi-threaded environment.

An illustration in java (from wikipedia)

public class Singleton 
{
  // Private constructor prevents instantiation from other classes
  private Singleton() {}
         
  /**
   * SingletonHolder is loaded on the first execution of Singleton.getInstance() 
   * or the first access to SingletonHolder.INSTANCE, not before.
  */
  private static class SingletonHolder 
  { 
    private static final Singleton INSTANCE = new Singleton();
  }
                                      
  public static Singleton getInstance() 
  {
    return SingletonHolder.INSTANCE;
  }
}

Another illustration in php

class singleton
{
  private static $_instance;
  
  //private constructor to prevent instantiation from other classes
  private function __construct()
  {  }

  private function __destruct()
  {  }

  // only first call to getInstance creates and returns an instance. 
  // next call returns the already created instance.
  public static function getInstance()
  {
    if(self::$_instance === null)
    {
      self::$_instance = new self();
    }
    return self::$_instance;
  }

}

How to get your passport made in simple easy steps.

Prelude : If you have the time, the patience and the ability to coerce and bribe people efficiently, you can save money by going directly to the passport office and interacting with the peon there. It seems that with good interaction skills, the passport can be had in a weeks time with a bribe of only 1000.

Preparation : If you lack the time, then, be prepared to spend around 4K. The list of documents required would be your
=> ID proof - pan card, Driving licence.
=> Residence proof - electricity bill, voter id card.
=> Age proof - school leaving certificate.
=> References - people who could vouch for you - someone who stays close by.

Step 1 : Look out for ads in newspapers for people who make passports. You can also ask people who hang around ATMs (offereing credit cards or policies). They generally work in association with the passport offices to "easily" get your form filled and application passed. When you are filling the application, remember to write your name and sign. Give all documents - they should not need the original documents (because they have some setup with the passport office). And pay them their "form submission fee" - which is passport fee + agent fee = around 2K. You can bargain. There are also agencies who specialize in making of passport and pan-card.

Step 2 : Followup with the "agent" to get the receipt of submission of application for passport. The actual process of creation of passport starts only after the application is submitted. If your agent has good connections and has greased the palms nicely with the money you have given, then you would get the receipt very fast.

Step 3 : Once the application receipt is in your hand - have another list of documents ready and wait -
=> ID proof
=> Residence proof - which shows residence at the location for more than a year.
=> Age proof
=> Residence proof of past addresses - at least two location where you have stayed earlier.

Step 4 : In 7-15 days time you would get an official from Intelligence department who would come to your house for verification. He would ask for all sorts of documents and keep you running around the house. The point he basically wants to make is that unless you grease his palms, he wont sign and forward the documents further. If you can show him all the documents he asks for, you will have an edge over him and may be able to bargain with him for the bribe money. Ofcourse he would start the bargain at 1K, but if your negotiation skills are good, you can bring him down to 500. Another point he will make is the police department (to whom he will be forwarding your app) can be bargained with - but do not trust him. The less you pay in the process of making him happy - the better.

Step 5 : Again wait for the police official who will come in a week's time. He will carry a file with him with maybe around 100 applications. He will start asking questions about where you have stayed earlier and the time of your stay. If you happen to carry residence proof of past addresses - you can have an edge over him. Else you have to just play along. If he threatens you that your past locations cannot be verified, dont worry - he is just trying to make you nervous - so he could extract more money in the bribe. Ask him gently about "how much would be needed to get the verification done ?" and he might ask for 1000 - again. If you try to bargain - he would say that he could make your application go around police stations for six months and your case will be lost. Dont worry - just bargain gently. If you tell him that the previous intelligence guy asked for the same amount - he would say that the guy had only a single sign to do - and he is supposed to get 3-4 signatures to do. Just play along and if possible, bring him down to 500. Pay him and wait.

Step 6 : Keep on checking the status of your passport online at http://passport.gov.in/. You will get a notification that your passport is on way. Keep a tab on the local post office and your snail-mail box.

Step 7 : A guy from the post may come to deliver the passport - within 15-20 days time. He would ask for "chai-pani". Dont offer him tea. Simply hand him 20-50 rs and get your passport.


The point to note here is that at every stage a hand has to be greased. Even if the details given by you are wrong, you would still get your passport if the hands are greased properly. Only the amount of grease will vary. With the 6th pay commission in force now - you might have hoped that the officials would be less greedy. But it has only lead to increase in the greed of the government officials and now they charge more for than before.

Monday, January 11, 2010

Forking Vs. Threading

What is Fork/Forking?

Fork is nothing but a new process that looks exactly like the old or the parent process but still it is a different process with different process ID and having it’s own memory. Parent process creates a separate address space for child. Both parent and child process possess the same code segment, but execute independently from each other.

The simplest example of forking is when you run a command on shell in unix/linux. Each time a user issues a command, the shell forks a child process and the task is done.

When a fork system call is issued, a copy of all the pages corresponding to the parent process is created, loaded into a separate memory location by the OS for the child process, but in certain cases, this is not needed. Like in ‘exec’ system calls, there is not need to copy the parent process pages, as execv replaces the address space of the parent process itself.

Few things to note about forking are:

  • The child process will be having it’s own unique process ID.

  • The child process shall have it’s own copy of parent’s file descriptor.

  • File locks set by parent process shall not be inherited by child process.

  • Any semaphores that are open in the parent process shall also be open in the child process.

  • Child process shall have it’s own copy of message queue descriptors of the parents.

  • Child will have it’s own address space and memory.


Fork is universally accepted than thread because of the following reasons:

  • Development is much easier on fork based implementations.

  • Fork based code a more maintainable.

  • Forking is much safer and more secure because each forked process runs in its own virtual address space. If one process crashes or has a buffer overrun, it does not affect any other process at all.

  • Threads code is much harder to debug than fork.

  • Fork are more portable than threads.

  • Forking is faster than threading on single cpu as there are no locking over-heads or context switching.


Some of the applications in which forking is used are: telnetd(freebsd), vsftpd, proftpd, Apache13, Apache2, thttpd, PostgreSQL.

Pitfalls in Fork:

  • In fork, every new process should have it’s own memory/address space, hence a longer startup and stopping time.

  • If you fork, you have two independent processes which need to talk to each other in some way. This inter-process communication is really costly.

  • When the parent exits before the forked child, you will get a ghost process. That is all much easier with a thread. You can end, suspend and resume threads from the parent easily. And if your parent exits suddenly the thread will be ended automatically.

  • In-sufficient storage space could lead the fork system to fail.


What are Threads/Threading?

Threads are Light Weight Processes (LWPs). Traditionally, a thread is just a CPU (and some other minimal state) state with the process containing the remains (data, stack, I/O, signals). Threads require less overhead than “forking” or spawning a new process because the system does not initialize a new system virtual memory space and environment for the process. While most effective on a multiprocessor system where the process flow can be scheduled to run on another processor thus gaining speed through parallel or distributed processing, gains are also found on uniprocessor systems which exploit latency in I/O and other system functions which may halt process execution.

Threads in the same process share:
== Process instructions
== Most data
== open files (descriptors)
== signals and signal handlers
== current working directory
== User and group id

Each thread has a unique:
== Thread ID
== set of registers, stack pointer
== stack for local variables, return addresses
== signal mask
== priority
== Return value: errno

Few things to note about threading are:

  • Thread are most effective on multi-processor or multi-core systems.

  • For thread – only one process/thread table and one scheduler is needed.

  • All threads within a process share the same address space.

  • A thread does not maintain a list of created threads, nor does it know the thread that created it.

  • Threads reduce overhead by sharing fundamental parts.

  • Threads are more effective in memory management because they uses the same memory block of the parent instead of creating new.


Pitfalls in threads:

  • Race conditions: The big loss with threads is that there is no natural protection from having multiple threads working on the same data at the same time without knowing that others are messing with it. This is called race condition. While the code may appear on the screen in the order you wish the code to execute, threads are scheduled by the operating system and are executed at random. It cannot be assumed that threads are executed in the order they are created. They may also execute at different speeds. When threads are executing (racing to complete) they may give unexpected results (race condition). Mutexes and joins must be utilized to achieve a predictable execution order and outcome.

  • Thread safe code: The threaded routines must call functions which are “thread safe”. This means that there are no static or global variables which other threads may clobber or read assuming single threaded operation. If static or global variables are used then mutexes must be applied or the functions must be re-written to avoid the use of these variables. In C, local variables are dynamically allocated on the stack. Therefore, any function that does not use static data or other shared resources is thread-safe. Thread-unsafe functions may be used by only one thread at a time in a program and the uniqueness of the thread must be ensured. Many non-reentrant functions return a pointer to static data. This can be avoided by returning dynamically allocated data or using caller-provided storage. An example of a non-thread safe function is strtok which is also not re-entrant. The “thread safe” version is the re-entrant version strtok_r.


Advantages in threads:

  • Threads share the same memory space hence sharing data between them is really faster means inter-process communication (IPC) is real fast.

  • If properly designed and implemented threads give you more speed because there aint any process level context switching in a multi threaded application.

  • .Threads are really fast to start and terminate


Some of the applications in which threading is used are: MySQL, Firebird, Apache2, MySQL 323

FAQ’s:

1. Which should i use in my application ?

Ans: That depends on a lot of factors. Forking is more heavy-weight than threading, and have a higher startup and shutdown cost. Interprocess communication (IPC) is also harder and slower than interthread communication. Actually threads really win the race when it comes to inter communication. Conversely, whereas if a thread crashes, it takes down all of the other threads in the process, and if a thread has a buffer overrun, it opens up a security hole in all of the threads.

which would share the same address space with the parent process and they only needed a reduced context switch, which would make the context switch more efficient.

2. Which one is better, threading or forking ?

Ans: That is something which totally depends on what you are looking for. Still to answer, In a contemporary Linux (2.6.x) there is not much difference in performance between a context switch of a process/forking compared to a thread (only the MMU stuff is additional for the thread). There is the issue with the shared address space, which means that a faulty pointer in a thread can corrupt memory of the parent process or another thread within the same address space.

3. What kinds of things should be threaded or multitasked?

Ans: If you are a programmer and would like to take advantage of multithreading, the natural question is what parts of the program should/ should not be threaded. Here are a few rules of thumb (if you say “yes” to these, have fun!):

  • Are there groups of lengthy operations that don’t necessarily depend on other processing (like painting a window, printing a document, responding to a mouse-click, calculating a spreadsheet column, signal handling, etc.)?

  • Will there be few locks on data (the amount of shared data is identifiable and “small”)?

  • Are you prepared to worry about locking (mutually excluding data regions from other threads), deadlocks (a condition where two COEs have locked data that other is trying to get) and race conditions (a nasty, intractable problem where data is not locked properly and gets corrupted through threaded reads & writes)?

  • Could the task be broken into various “responsibilities”? E.g. Could one thread handle the signals, another handle GUI stuff, etc.?


Conclusions:

1. Whether you have to use threading or forking, totally depends on the requirement of your application.
2. Threads more powerful than events, but power is not something which is always needed.
3. Threads are much harder to program than forking, so only for experts.
4. Use threads mostly for performance-critical applications.

source : http://www.geekride.com/index.php/2010/01/fork-forking-vs-thread-threading-linux-kernel/

Friday, December 25, 2009

Gearman with php and mysql

In the earlier post we learned how to push jobs from the client to the worker. What we will try to do here is to use php script - the same worker we developed last time to process queries in the mysql server. That is to use gearman to process requests posted inside mysql client.

We would need the mysql UDFs for gearman which could be downloaded from the gearman.org

http://gearman.org/index.php?id=download#databases

Once you have downloaded the gearman mysql UDFs, untar it and compile it. I am using gearman-mysql-udf version 0.4 and mysql version 5.1.30 installed in path /usr/local/mysql here.

tar -xvzf gearman-mysql-udf-0.4.tar.gz
cd gearman-mysql-udf-0.4/
./configure --with-mysql=/usr/local/mysql/bin/mysql_config --libdir=/usr/local/mysql/lib/plugin/
make
sudo make install


check if the so files have been installed properly

jayant@gamegeek:~$ ls /usr/local/mysql/lib/plugin/
libdaemon_example.a libdaemon_example.so.0 libgearman_mysql_udf.la libgearman_mysql_udf.so.0.0.0 mypluglib.so
libdaemon_example.la libdaemon_example.so.0.0.0 libgearman_mysql_udf.so mypluglib.a mypluglib.so.0
libdaemon_example.so libgearman_mysql_udf.a libgearman_mysql_udf.so.0 mypluglib.la mypluglib.so.0.0.0

You wll see libgearman_mysql_udf.* files here.

Now load the gearman-mysql-udfs into mysql using the following queries

CREATE FUNCTION gman_do RETURNS STRING
SONAME "libgearman_mysql_udf.so";
CREATE FUNCTION gman_do_high RETURNS STRING
SONAME "libgearman_mysql_udf.so";
CREATE FUNCTION gman_do_low RETURNS STRING
SONAME "libgearman_mysql_udf.so";
CREATE FUNCTION gman_do_background RETURNS STRING
SONAME "libgearman_mysql_udf.so";
CREATE FUNCTION gman_do_high_background RETURNS STRING
SONAME "libgearman_mysql_udf.so";
CREATE FUNCTION gman_do_low_background RETURNS STRING
SONAME "libgearman_mysql_udf.so";
CREATE AGGREGATE FUNCTION gman_sum RETURNS INTEGER
SONAME "libgearman_mysql_udf.so";
CREATE FUNCTION gman_servers_set RETURNS STRING
SONAME "libgearman_mysql_udf.so";

check whether they have been properly loaded. log into mysql and run.


mysql> select * from mysql.func;
+-------------------------+-----+-------------------------+-----------+
| name | ret | dl | type |
+-------------------------+-----+-------------------------+-----------+
| gman_do | 0 | libgearman_mysql_udf.so | function |
| gman_do_high | 0 | libgearman_mysql_udf.so | function |
| gman_do_low | 0 | libgearman_mysql_udf.so | function |
| gman_do_background | 0 | libgearman_mysql_udf.so | function |
| gman_do_high_background | 0 | libgearman_mysql_udf.so | function |
| gman_do_low_background | 0 | libgearman_mysql_udf.so | function |
| gman_sum | 2 | libgearman_mysql_udf.so | aggregate |
| gman_servers_set | 0 | libgearman_mysql_udf.so | function |
+-------------------------+-----+-------------------------+-----------+
8 rows in set (0.00 sec)


Now lets try calling the reverse function we developed in php to process some work from mysql client. For this.

start gearmand if it is not running
gearmand

start the worker
php -q gearmanWorker.php

log into mysql and run the following queries.

select gman_servers_set('127.0.0.1');
SELECT gman_do("reverse", Host) AS test FROM mysql.user;

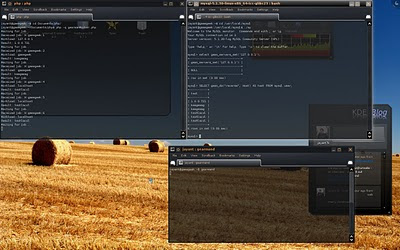
The output is as below....


Here we have simply said that all functions would be processed by worker running on 127.0.0.1.
We could also set function wise servers - different servers for different functions
SELECT gman_servers_set("192.168.1.1", "sortme");
SELECT gman_servers_set("192.168.1.2", "reverseme");

And multiple servers for the same function.
SELECT gman_servers_set("192.168.1.3:4730,192.168.1.4:4730", "factorialme");

Interesting, right??
Enjoy!!!

Using gearman to distribute your work...

Gearman is a system to farm out work to other machines, dispatching function calls to machines that are better suited to do work, to do work in parallel, to load balance lots of function calls, or to call functions between languages.

How does gearman work? Well, a gearman powered app consists of a client, a worker and a job server. The client creats a job and sends it to the job server. The job server finds a suitable worker and sends the job to the worker. Once the job is done, the worker sends the response back to the client via the job server. There are client and worker APIs available for gearman for different languages which allow the app to communicate with the job server.

Too heavy is it... Lets check how this thing actually runs.

Download gearman daemon from http://gearman.org/index.php?id=download

You would need the "Gearman server and library" - the one written in c. And a php extension which we will use to create and communicate with our workers.

I am using gearmand version 0.11, gearman extension for php version 0.60 and php version 5.3 here.

extract the gearmand server and install it using
./configure
make
sudo make install

extract the php extension for gearman and install it using
phpize
./configure
make
sudo make install

Enable the extension in php.ini. Add the following line in php.ini

extension=gearman.so

To check if the extension has been enabled run

php -i | grep -i gearman

And you will see something like

gearman
gearman support => enabled
libgearman version => 0.11

Now lets write some scripts and check how this works

Create a php client :
                 
<?php
# Create our client object.
$client= new GearmanClient();

# Add default server (localhost).
$client->addServer();

echo "Sending job\n";

# Send reverse job
$result = $client->do("reverse", "Hello World");
if ($result)
echo "Success: $result\n";
?>


Create a php worker :

<?php
# Create our worker object.
$worker= new GearmanWorker();

# Add default server (localhost).
$worker->addServer();

# Register function "reverse" with the server.
$worker->addFunction("reverse", "reverse_fn");

while (1)
{
print "Waiting for job...\n";

$ret= $worker->work();
if ($worker->returnCode() != GEARMAN_SUCCESS)
break;
}

# A much simple reverse function
function reverse_fn($job)
{
$workload= $job->workload();
echo "Received job: " . $job->handle() . "\n";
echo "Workload: $workload\n";
$result= strrev($workload);
echo "Result: $result\n";
return $result;
}
?>


To test the process

start the gearmand server
gearmand

start the worker
php -q gearmanWorker.php

And send jobs to the worker
php -q gearmanClient.php

The output is as below

Wednesday, December 09, 2009

Using ssh tunneling to tunnel your browser requests.

You will need :

  • A ssh server - a machine with access to the net which has ssh server installed on it. We will use this server to forward our requests. You should have access to the server.

  • A ssh client - installed on your machine.

  • A web browser - preferably firefox or internet explorer. Most basic browsers do not support socks proxy.


creating the tunnel :

The way to create the tunnel is

ssh -D 8888 <your_username>@<your_machine_ip_or_host>

What this command does is it hands over requests to localhost port 8888 to the server that you have specified. Ofcourse, you will have to login and authenticate yourself for the requests to reach the server. You can do this on whichever server you have access to. Using localhost would be the best.

Configure your browser :

To set socks proxy on firefox go to
Edit->Preferences->Advanced->Network->Settings

Enter socks host as localhost and socks port as 8888. And bingo now your requests are being tunneled from your browser to the ssh server through a ssh tunnel. And from there to the web server.

You can use www.whatismyip.com to check the external ip address of your machine.

You can use foxy proxy extension in firefox to have different proxy settings for different sites.